
Configuring a Dial-Up S2S IPSec tunnel between a Mikrotik and Fortigate Responder


Introduction
IPSec tunnels provide a robust and reliable solution for establishing secure communications over public networks. In this guide, we will walk through the process of configuring a dial-up IPSec VPN tunnel between a MikroTik router (as the initiator) and a FortiGate firewall (as the responder). This setup is ideal for scenarios where remote devices need to connect to a centralised network securely. By following these steps, you'll ensure your data remains protected while traversing untrusted networks.
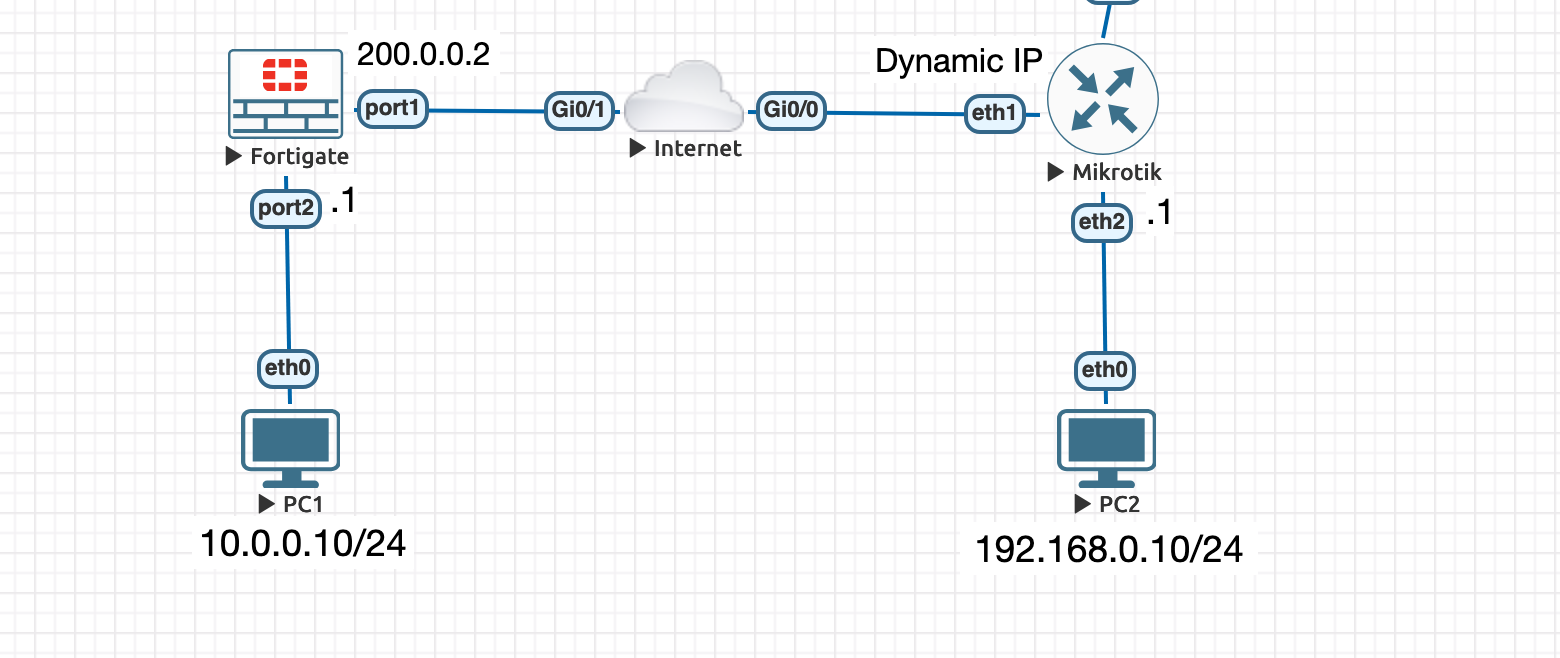
Example Topology:
Stage 1: On Mikrotik (Dial Up client)
Step 1: IPSec Profile
/ip ipsec profile add name=to-fortigate-p1 \
  enc-algorithm=aes-128 hash-algorithm=sha256
  dh-group=modp2048 lifetime=1 nat-traversal=yes
  dpd-interval=20 dpd-maximum-failures=3
Step 2: IPSec Proposal
/ip ipsec proposal add name=to-fortigate-p2
  enc-algorithms=aes-128-cbc auth-algorithms=sha256 \
  pfs-group=modp2048
Step 3: IPSec Peer and Identity
/ip ipsec peer
  add address=200.0.0.2/32 name=Fortigate-WAN profile=to-fortigate-p1 exchange-mode=ike2

/ip ipsec identity
  add peer=fortigate-WAN secret=strongpassword
Step 4: IPSec Policy
/ip ipsec policy add src-address=192.168.0.0/24 src-port=any \
  dst-address=10.0.0.0/24 dst-port=any tunnel=yes  \
  action=encrypt proposal=to-fortigate peer=fortigate-WAN
Step 5: Configure Nat Bypass
**It is very important that the bypass rule is placed at the top of all other NAT rules.**
/ip firewall nat place-before=0 \
   src-address=192.168.0.0/24 dst-address=10.0.0.0/24
   chain=srcnat action=accept
If you previously tried to establish an IP connection before the NAT bypass rule was added, you have to clear the connection table from the existing connection or restart the Router
Step 6: (Optional) Configure IP/Fasttrack Bypass (If feature is enabled)
See Note "2" for more details
ip firewall raw add action=notrack chain=prerouting \
  src-address=192.168.0.0/24 dst-address=192.168.0.0/24
Verify
ip ipsec export
"Show" commands
/ip ipsec active-peers print
/ip ipsec installed-sa print
Stage 2: On Fortigate (Dial Up Server/Responder)
Step 1: Configure Phase 1
config vpn ipsec phase1-interface
    edit "to-Mikrotik-p1"
        set type dynamic
        set interface "port1"
        set ike-version 2
        set peertype any
        set keylife 86400
        set proposal aes128-sha256
        set dhgrp 14
        set dpd-retrycount 3
        set dpd-retryinterval 20
        set psksecret strongpassword
    next
end
Step 2: Configure Phase 2
config vpn ipsec phase2-interface
    edit "S2S-to-Mikrotik"
        set phase1name "to-Mikrotik-p1
        set proposal aes128-sha256
        set pfs enable
        set dhgrp 14
        set keylifeseconds 43200
        set add-route enable
        set src-subnet 10.0.0.0 255.255.255.0
        set dst-subnet 192.168.0.0 255.255.255.0
    next
end
Step 3: Static Route:
You don't need a static route because the "add-route" option will automatically add/remove a static route entry for the destination subnet selector, based on the status of the Ipsec tunnel.
This is an important because a static route defined over an IPsec VPN tunnel will remain in the routing table of a dialup VPN server (IPsec receiver) even if the IPsec VPN tunnel is down. After upgrading the code from v6.4 (or earlier) to v7.0 (or later).
Step 4: Create Address Objects
config firewall address
  edit Fortigate-LAN
    set subnet 10.0.0.0 255.255.255.0
    next
  edit Mikrotik-LAN
    set subnet 192.168.0.0 255.255.255.0
    mext
  end
Step 5: Create Firewall Policy
config firewall policy
    edit 0
        set name "ALLOW FORTIGATE to MIKROTIK IPSEC"
        set srcintf "port2" "S2S-to-Mikrotik"
        set dstintf "port2" "S2S-to-Mikrotik"
        set action accept
        set srcaddr "Mikrotik-LAN" "Fortigate-LAN"
        set dstaddr "Mikrotik-LAN" "Fortigate-LAN"
        set schedule "always"
        set service "ALL"
    next
end
Stage 3: Troubleshooting
On Mikrotik
log print
On Fortigate
Phase 1 Status
get vpn ipsec tunnel summary
Debug Phase 1
diagnose vpn ike log-filter dst-addr4 100.0.0.2
diagnose debug application ike -1
diagnose debug application fnbamd -1
diagnose debug console timestamp enable
diagnose debug enable
Debug Phase 2
If the status of Phase 1 is in an established state, then focus on Phase 2. To do so, issue the command:
diagnose vpn tunnel list name to-Mikrotik-p1
The output might be something similar to this:
list all ipsec tunnel in vd 0
name=to-Mikrotik-p1 ver=1 serial=2 100.0.0.2->200.0.0.2:0
bound_if=10 lgwy=static/1 tun=intf/0 mode=auto/1 encap=none/8 options[0008]=npu
proxyid_num=1 child_num=0 refcnt=10 ilast=25 olast=25 ad=/0
stat: rxp=0 txp=0 rxb=0 txb=0
dpd: mode=on-demand on=0 idle=20000ms retry=3 count=0 seqno=534
natt: mode=none draft=0 interval=0 remote_port=0
proxyid=to-Mikrotik-p1 proto=0 sa=0 ref=1 serial=4
src: 0:172.16.170.0/255.255.255.0:0
dst: 0:192.168.0.0/255.255.255.0:0
The important field from the particular output is the ‘sa’. SA can have three values:
- sa=0 indicates there is a mismatch between selectors or no traffic is being initiated.
- sa=1 indicates IPsec SA is matching and there is traffic between the selectors.
- sa=2 is only visible during IPsec SA rekey.
Lastly, there might be cases where the encryption and hashing algorithms in Phase 2 are mismatched as well.
In order to identify this kind of error, run IKE debugging as it was described above in "Debug Phase 1"
Note: If it is necessary to also perform packet captures, it is advised to always run the following command to match debug message time with packet sniffer time and know exactly what is happening and when:
diag debug console time en
Notes
1. NAT
If the Mikrotik router has NAT rules (masquerade) that are changing source addresses before a packet is encrypted, A router is unable to encrypt the packet because the source address does not match the address specified in the policy configuration.
To fix this we need to set up IP/Firewall/NAT bypass rule.
The "srcnat" chain is is a little misleading, because the doesnt NAT , it just explicitly accept the traffic and because its at the top, it allows bypass of any additional potentially problematic NATs.
2. Fasttrack Bypass
f you have IP/Fasttrack enabled, the packet bypasses IPsec policies. So we need to add accept rule before FastTrack
/ip firewall filter add chain=forward action=accept place-before=1 \
src-address=192.168.0.0/24 dst-address=10.0.0.0/24 \
connection-state=established,related
However, this can add a significant load to the router's CPU if there is a fair amount of tunnels and significant traffic on each tunnel.
The solution is to use IP/Firewall/Raw to bypass connection tracking, that way eliminating the need for filter rules listed above and reducing the load on CPU by approximately 30%. This is what we did in Stage 1 - Step 6.